Amazing Batman Crafts to Have Fun with Kids · Craftwhack
If you've got a Batman fan in your household, there are and so many Batman crafts you can become into – some merely for the fun of crafting, and some for the creation of amazing and practical bedroom decorations that volition make your little Batman fan thrilled with their bedroom.
Batman Flashlight
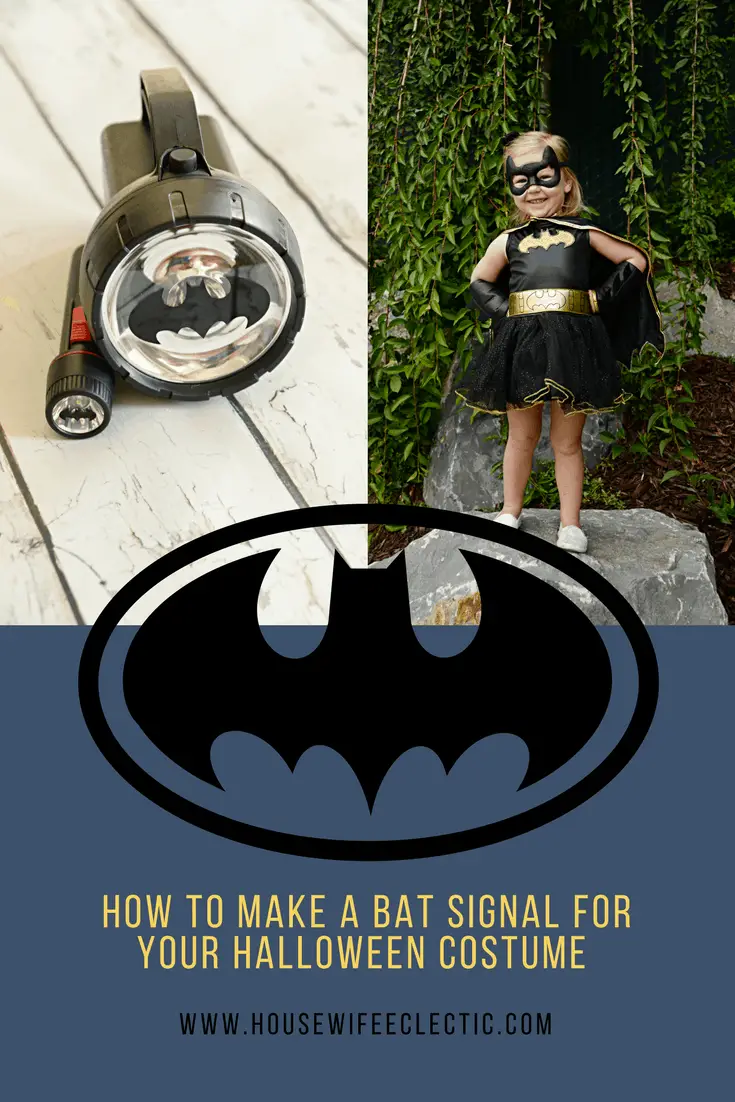
If your child has a flashlight or loves the thought of creating a special 1, this is the perfect craft for you to do together. Annotation that you'll demand the flashlight to be bright in order for this to piece of work well, and you lot should use one with an LED bulb so it won't get hot.
Materials
You're going to need:
- Black flashlight
- Black carte du jour
- Yellow tissue newspaper
- Scissors
- Pencil
- Gum
- Tape
- Yellow card (optional)
Footstep 1: Cut Out The Bat
First, yous are going to assist your kid describe a bat on the black carte. Its wingspan should be about the same width equally the flashlight'southward finish so that information technology goes from one side to the other. A little shorter is fine, but you don't want it to be longer.
Step two: Tape The Tissue On
Cut out a circumvolve of yellow tissue newspaper, and go your child to help y'all stick this over the end of the flashlight. Endeavour to become it corking and however you lot don't end upwardly with any creases that volition affect the flashlight'south beam.
Using tape makes this piece of cake to remove if you want to turn it back into a normal flashlight afterward.
Step iii: Add The Bat
Mucilage the bat to the tissue cover using a few dots of glue. Printing down gently so you lot don't tear the tissue, and leave it to dry.
At present, when you plough the flashlight on, you should get a yellow circumvolve of light with a black bat shadow in the eye – perfect for signaling that Gotham is nether threat! Your child will love this part of their criminal offense-fighting toolkit.
Footstep 4: Decorate The Flashlight (Optional)
If your child wants to decorate the flashlight farther, you can cut an oval of a yellowish menu, with a bat to lucifer (the aforementioned width) out of the black menu. Glue this to the handle of the flashlight. Try non to put it where your child's mitt volition grip the flashlight, or it may come up off after some use.
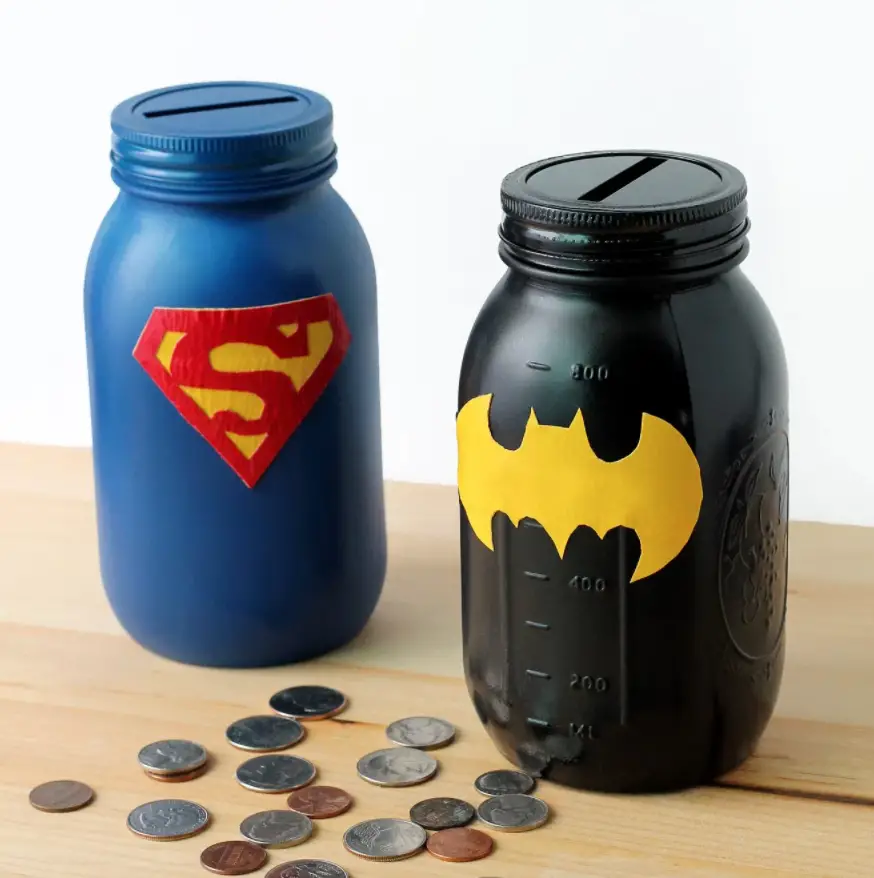
Batman Penny Jar
Source: https://www.firefliesandmudpies.com/mason-jar-superhero-banks/
If your child is starting to take an interest in coin, this can make a keen improver to their bedroom and tin assist them understand about saving and spending. Fifty-fifty if your child isn't yet old enough to handle money, they tin have fun with a Bat-Jar to post buttons and tokens in.
Materials
Yous're going to need:
- one jar (preferably with a coin-slot lid)
- Black spray pigment
- Yellow paper
- Pair of scissors
- Gum gun
Step one: Spray Paint The Jar
Brainstorm by spray painting the jar and its lid a solid black all over. You should do this in a well-ventilated infinite, preferably exterior, and away from your children so they don't accidentally inhale the fumes. Leave the jar to dry.
Pace two: Cut Out A Bat
Take your yellowish paper and cut out a bat silhouette. Y'all tin can likewise print a silhouette from the net if you don't like drawing.
Yous might want to make a bat for either side of the jar, or just one for the front – it's up to yous. When you've finished cut the bats out, glue them to the jar. The bold yellow should look bully against the black.
Stride 3: Screw The Lid On
Spiral the lid onto the jar and stand it on your kid's desk, ready to have coins into its slot!
If yous are unable to get a coin-slot chapeau for your jar, you tin instead make a circle of stiff black cards, cut a slot into it, and stick one side to the jar with tape. This will create a hinged lid that can be folded back to allow your child tip the coins out. It will normally sit in identify and allow them to use its slot.
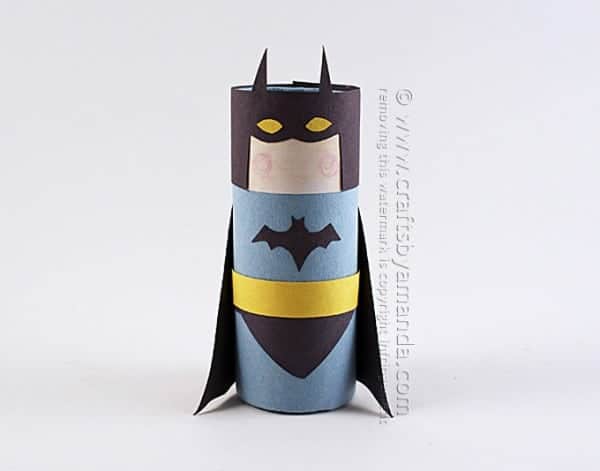
Toilet Tube Batman
Source: https://craftsbyamanda.com/cardboard-tube-batman-arts and crafts/
Toilet tube crafts are peachy fun, and very easy for kids to do with minimal adult input. This Batman craft volition look cool continuing on a desk, or yous could fifty-fifty hang him up, leaping between city buildings with his greatcoat whipping in the air current.
Materials
You're going to need:
- 1 empty toilet tube
- Colored pens
- Black felt
- Black paper
- Pencil
- Glue
- Clear fishing line (optional)
Step 1: Describe The Template
Before your child gets started on this craft, you may want to draw some outlines for them to follow and so they can color Batman finer. An older child may be able to do this footstep for themselves; younger ones volition need help.
First, draw a line approximately 1/3 into the tube. This will be Batman's head. You tin can draw some lines for his mask, or let your kid fill that in when they come up to color.
Next, draw a band about halfway downwardly the remaining part of the tube. This should be near a centimeter broad and will be Batman's yellow belt.
Stride 2: Color Batman
Set your child coloring in Batman while you make the other parts of this craft; they can add together as much detail as they similar, giving Batman a proper face up and a complicated chugalug, or go along things elementary.
It's upward to them what color they exercise Batman's body, just if they cull bluish, the cape and mask and bat details will stand out better, whereas an all-black Batman may look a piddling flat and apparently.
Step three: Cut Out The Bat And Ears
Cut a small bat outline out of a black card, and give this to your child to gum to Batman's chest. Next, cut out two small triangles for Batman'southward ears, and these can be glued to his caput at the top of the toilet tube.
Pace iv: Cut Out The Cape
Batman isn't Batman without a sweeping black cape. Cut a rectangle of felt (or similar material), a little shorter than the toilet tube. When your child has finished coloring and detailing the tube, glue this cape around the back edge, starting at the line of Batman's face up. This should requite it a great, finished expect.
Footstep v: Hang Up (Optional)
If yous want Batman swooping above Gotham with his grappling hooks, add a dot of gum to the back of the toilet tube, just above the cape, and gum a length of clear fishing line to information technology. Tie a loop in the other finish, and append Batman in the air.
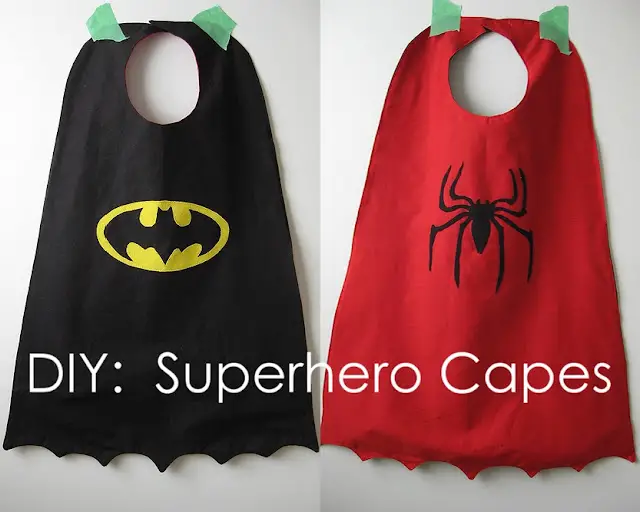
Batman Greatcoat
Source: https://handmadebyjt.blogspot.com/2013/04/tutorial-diy-superhero-capes.html
Your child might be more than interested in becoming Batman themselves than in creating Batman crafts for their room – and if so, a Batman cape is an easy arts and crafts to create, and volition undoubtedly see plenty of apply, particularly on fancy dress days.
Materials
You're going to demand:
- 1 large piece of black fabric (from your child's shoulders to simply above their ankles)
- one pocket-size piece of yellowish fabric
- Yellow thread
- Blackness thread
- Needle
- Cloth scissors
- Velcro or a press stud
- A slice of chalk
- Pins
- Sewing machine (optional)
Footstep one: Shape The Neck
The neck is the trickiest part of a cape to become correct; it wants to fit your child comfortably. To get an even neckline, yous are going to fold your piece of fabric in one-half, pivot it, and cut a "C" shape about 2 or three inches down from the top. The further down, the wider the cloth on the shoulders will exist.
Unfold the fabric and exam information technology around your child's neck. Information technology is better to cutting the "C" as well modest to showtime with; you lot can so enlarge it. It doesn't need to be a very snug fit, but cut a petty at a time and work on it until you have created a shape that you are happy with.
Step two: Draw The Cape
The cape should stop a trivial above your child's ankles, and it tin can be equally wide as yous like. A good dominion of pollex is that ignoring the cervix and shoulders, the cape will be roughly square – so the same width and length.
Get-go by again folding the greatcoat in half, as this will continue both sides fifty-fifty. Pivot it and then it won't shift while you describe or cut. Use the chalk to describe a curve from above the neck hole you have cut, and so gradually slope outwards so that the lesser of the cape will end up wider than the superlative.
Rub out any bits of the line you lot are unhappy with, and hold the folded cape up to your kid to check its length before yous start cutting.
Step 3: Cut The Greatcoat
As before, you tin trim more later if you need to; don't cutting also much off, to begin with, or you may end up having to start from scratch. Information technology is all-time to cut wider than y'all expect the cape to be and then trim a little more off.
Cut in a straight line, smoothing off whatsoever angles, and your cape should be looking adept! Measure information technology on your child over again to bank check its fit.
Pace 4: Cut The Logo
Next, take your yellow fabric and describe a bat outline on it, nice and large so that information technology volition show up well on the cape. You desire the symbol around the upper centre of your kid's back, then if necessary, get them to put the cape on and mark an approximate position using the chalk before you commencement.
Cut your logo out, and spread the greatcoat out flat then you lot can become the positioning right. Pin the symbol into identify, and then stitch it on using yellow thread.
Step 5: Hem The Cape
The cape will need hemming, and if you have a sewing machine, now is the time yous'll want to apply information technology, every bit this will take a while to do by hand.
Notwithstanding, information technology's perfectly possible to do it past hand if you don't have a machine; cull a quiet evening and put a adept moving-picture show on to lookout while you stitch. The edge does not need to be super neat, so don't worry if your sewing skills aren't perfect.
Footstep half-dozen: Add The Fastener
Finally, your child's Batman cape needs a fastener. You take a lot of options here. Velcro is an easy one, and you can merely sew a piece to either side of the cape'southward "shoulders" and stick them together. However, if yous don't have Velcro, there are other choices.
A press stud will as well work, though information technology's slightly trickier for pocket-sized fingers to fasten independently. A push can serve if yous sew a loop for information technology to spike through.
Alternatively, yous tin sew the ii sides together using a small strip of blackness elastic; this volition ensure the greatcoat never comes undone and volition allow your kid only stretch it to pull information technology on and off. Whatsoever of these options will do to finish the cape.
You lot're now all done, so step back and admire your mini Batman and your difficult work!
Batman Shadow Puppets
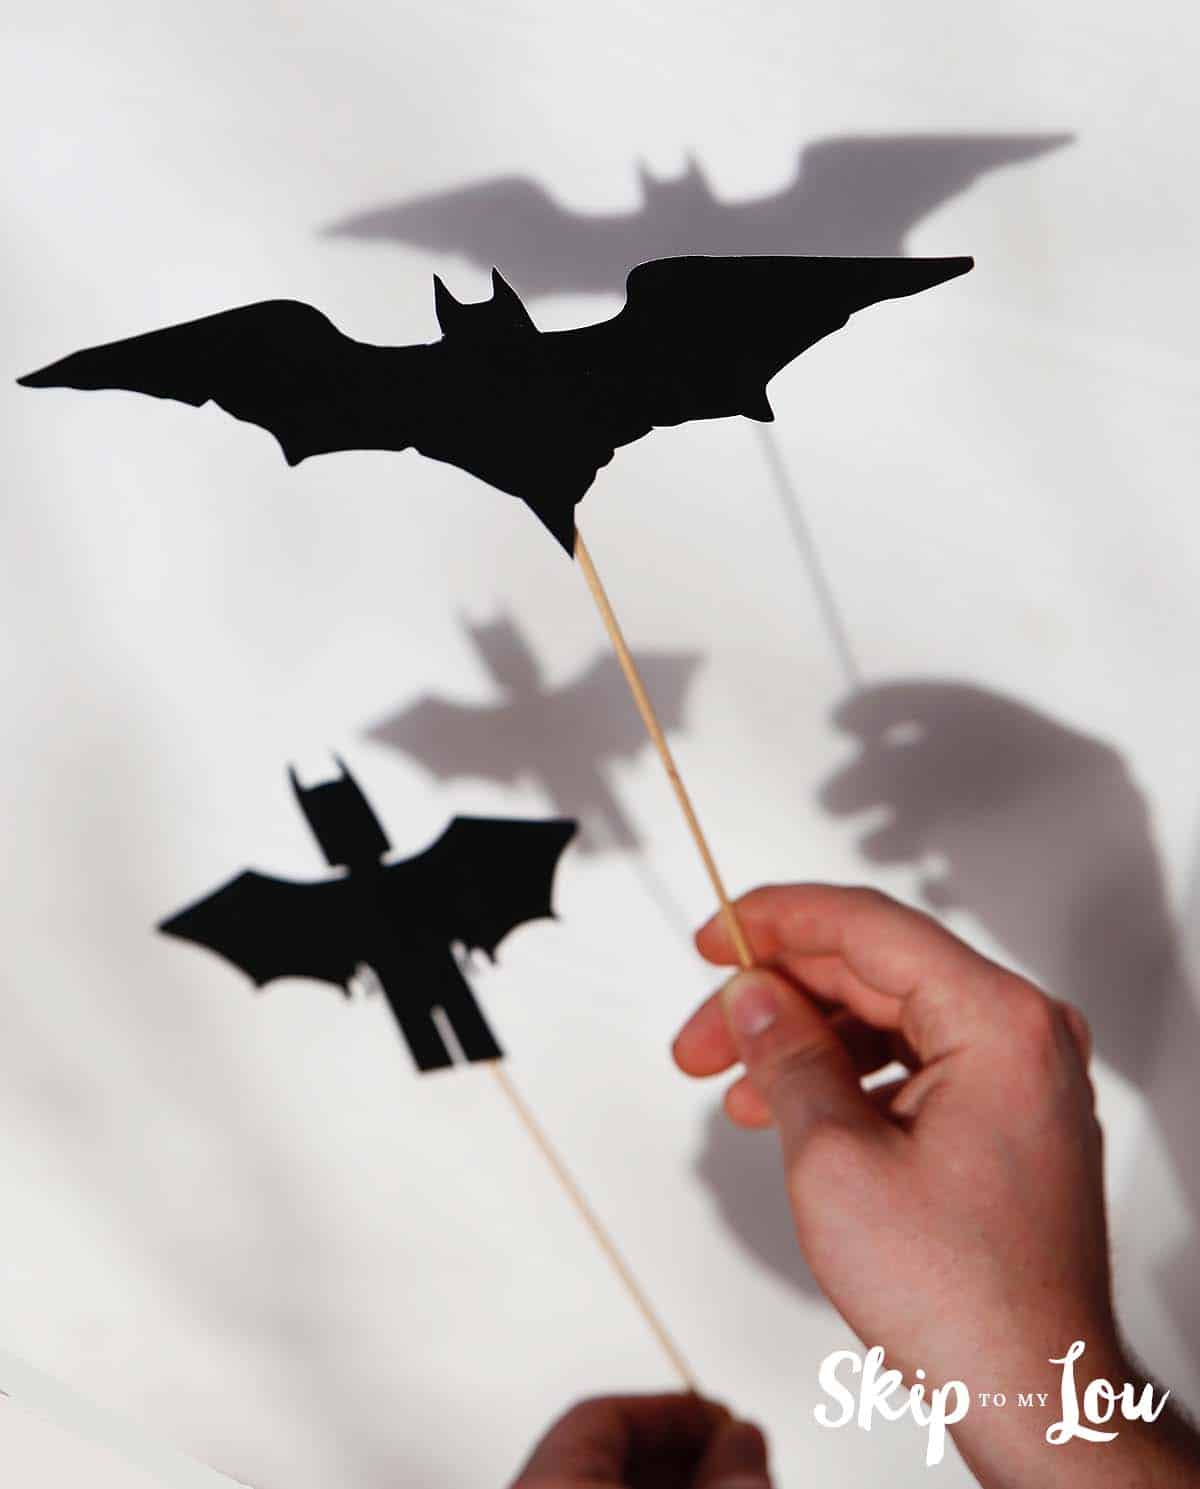
Source: https://www.skiptomylou.org/lego-batman-shadow-puppets-printables/
If you desire a fun arts and crafts to include in a light show or puppet theater, these Batman puppets are pretty easy for you to make with your kid. You don't need a lot of materials or a lot of time, and then you lot tin make a whole agglomeration, or add other superheroes in in that location – but Batman works best.
Materials
You lot will crave:
- Black card
- Pair of scissors
- Pencil
- Wooden skewers or toothpicks
- Glue gun
- A light source
Pace 1: Cut Out Silhouettes
On your black card, y'all're going to help your child draw some bat silhouettes. Use the Batman symbol for inspiration and keep these very uncomplicated outlines.
You can also draw a Batman head (essentially a square with rounded edges and pointed ears) with bat wings and two rectangle legs to create a unproblematic flight Batman. These should be fairly easy for you and your child to create – they don't need to be perfect!
When you lot're happy with your shapes, cutting them out. Effort to get crisp cuts as clean edges are what will brand this arts and crafts look cracking.
Step two: Glue Onto Skewers
Glue i shape to each skewer. You may want to cut the skewers down a scrap, but they desire to exist long enough for your kid to easily grip, without their hand getting in the fashion of the shadow the puppet casts.
Footstep 3: Turn On The Lite
Turn your low-cal source on and admire how the puppets bandage shadows on any blank wall. Your child can accept great fun making upwardly adventures with Batman, and you tin use other props (such as cereal boxes or nearly any solid object) to create tower blocks and alleyways for Shadow Batman to explore.
When not in use, stand the puppets in a pencil pot so that they don't go aptitude; this will make them last longer, and they'll also serve as a decoration in their own right.
Cork Batman
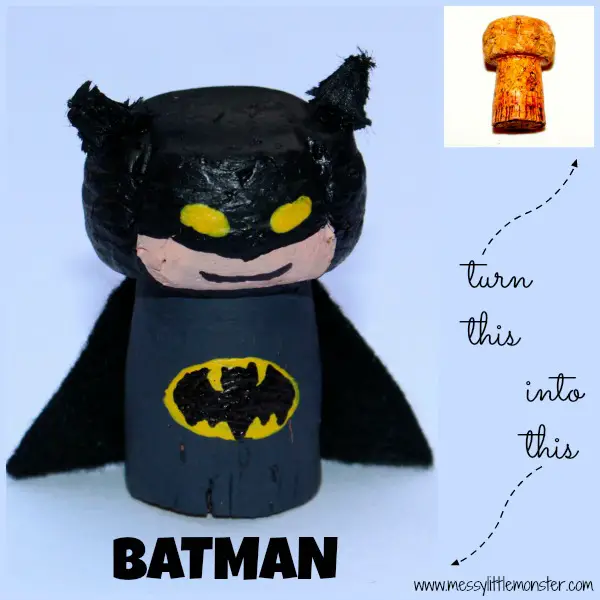
Source: https://www.messylittlemonster.com/2015/01/batman-figure-cork-crafts.html
For anyone who has some corks in the craft box, this is a great projection to do with the kids on a rainy afternoon – and it's nice and easy. It would likewise make a absurd activity at a Batman-themed party, and you lot could do other superheroes too.
Ideally, you want corks that are shaped similar mushrooms and have rounded tops. However, if you don't have those, yous can use normal corks and supervene upon the top with a black pom-pom for Batman's head.
Materials
You will require:
- Corks
- Black acrylic paint
- Paintbrush
- Xanthous acrylic paint
- Skin-tone acrylic paint
- 1 black pipe cleaner
- Fine black marker
- Black felt
- Scissors
- Glue gun
Step 1: Paint The Cork
Unsurprisingly, this craft starts by painting most of the cork black. Earlier y'all commencement, you may want to draw an oval for Batman'southward face so that your kid doesn't paint over this part (as the skin-tone paint won't easily encompass the black).
To become his face correct, you desire to draw an oval, dip information technology downwardly in the center where Batman's mask covers his nose. Simply the oral cavity and surrounding face should exist visible; these are the parts that will be painted with the peel-tone paint in one case the black pigment has dried.
Help your child paint the whole of Batman black, and and then fix the cork aside to dry out.
Step 2: Brand The Ears
While the paint dries, help your child to cut ii small pieces of pipe cleaner, and put a sharp angle in these to create triangular ears. If y'all don't have a pipe cleaner, you can besides cut these out of a piece of menu.
Step iii: Cut The Cape
Cut a pocket-sized cape out of the black felt. This will be glued to the cork at the end to cease Batman'due south iconic costume.
Stride 4: Cease The Painting
Assistance your kid to pigment Batman's face in the oval that yous left unpainted earlier. Next, use the yellow paint to add two oval eye holes higher up this, in the mask. You might need to add a adequately generous dab to make the yellowish encompass the black properly.
Add another, larger oval to the center of the Batman cork body. This is where your child will draw Batman's symbol later. Again, be generous with the yellowish pigment, and then gear up the cork bated again so that there is no risk of smudging.
Step 5: Add The Ears And Cape
Apply the glue gun to stick the ears to the top of Batman'due south head, and then add his cape around the cork'south "shoulders" (just below the bulge).
Footstep 6: Add together Final Details
Before drawing directly onto the cork, get your child to practice drawing a minor bat with the marker pen on newspaper. They demand to be able to depict a simple bat outline reliably. Go them to exercise a few times earlier they try on the cork.
Finally, add two little lines in the yellow heart marks, and Batman is consummate! Stand up him on a desk to fight criminal offence.
Batman Bookend
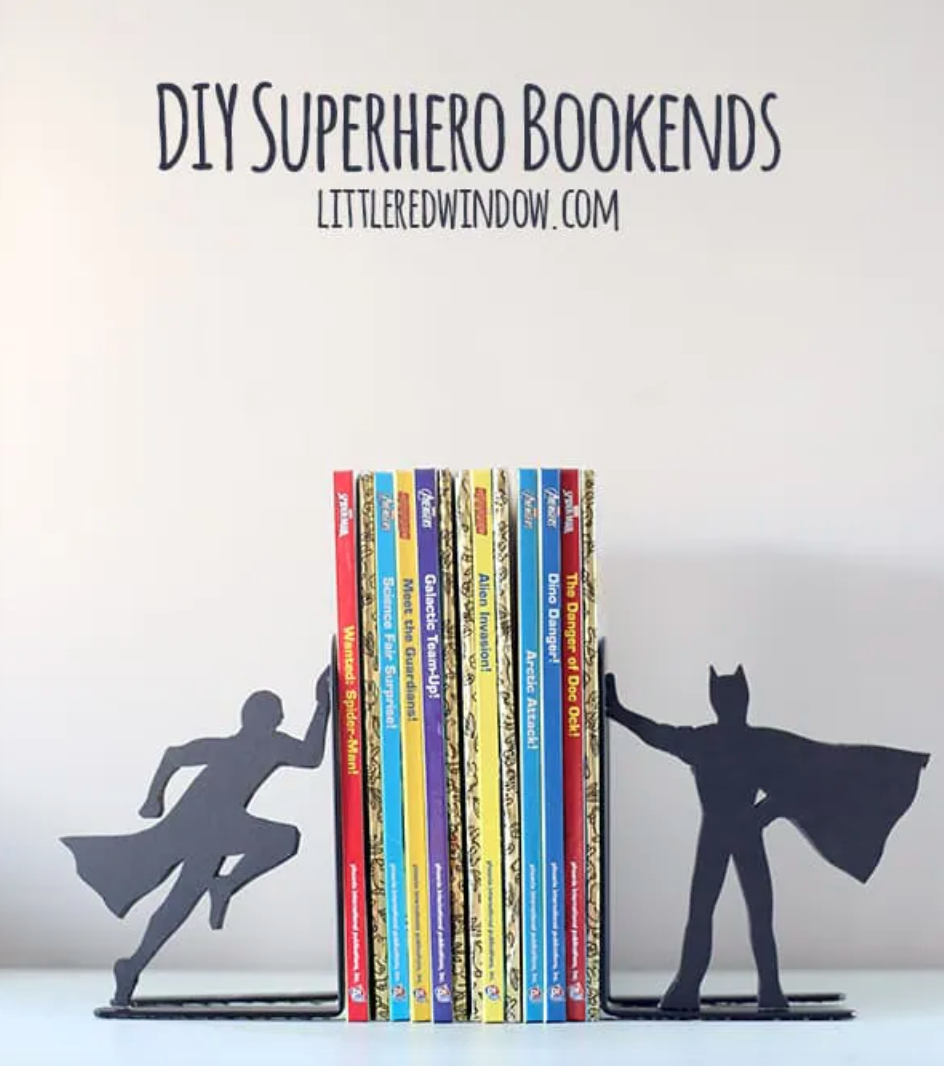 Source: https://littleredwindow.com/diy-superhero-bookends/
If your child's bookcase needs a new guardian, this bookend has it covered. You tin can either utilize your artistic talent for this ane or look online to find a suitable picture of Batman with his hand outstretched, as though holding upwards books.
You may detect this craft easier to exercise without your kid as it doesn't have many child-friendly aspects – they will just beloved the end issue.
Materials
You will require:
- ane metal bookend
- Some black cream
- Craft knife
- Glue gun
- White paper
- Pencil
- Pair of scissors
- White pen (or another that volition show upwards on the cream)
- Cut lath
Footstep 1: Describe A Template
On your white paper, draw a template of Batman, about the same size as the bookend. You can proceed information technology quite simple, either with him holding the books upwards with i paw, or looking every bit though he is attempting to push them over (with both hands braced against the bookend).
Alternatively, describe him leaning with his back against the books, or even sitting cross-legged confronting them. Y'all could make a different design for either stop of the bookcase.
One time you're happy, cut the template out.
Step ii: Cut Your Foam
Use the white pen to draw effectually the template onto the foam, and so cutting this out with the craft pocketknife. Smooth off any athwart edges.
Step 3: Glue To The Bookend
Glue your foam silhouette to the bookend using your hot glue gun, and and so you take a completed craft! Never fright, books; Batman lurks in the shadows, ready to help!
Determination
Batman crafts are an amazing fashion to have fun with your child and become them inspired for crafts. You can craft handmade birthday or Christmas gifts, organize Batman-themed party activities, or just spend a wet afternoon creating a few $.25 and pieces for their sleeping accommodation.
Whatever yous choose to do, Batman's distinctive colors and iconic symbol will make any arts and crafts expect great!
Source: https://craftwhack.com/batman-craft/
0 Response to "Amazing Batman Crafts to Have Fun with Kids · Craftwhack"
Post a Comment